
Maple opens with an empty "worksheet". This is the canvas by means of which the user interfaces with Maple.
The first screen presented to the user is a tip of the day window and a help panel superposed on a blank document. The tip of the day message is both informative and fun to read. You can learn useful tricks about Maple by displaying various messages. Click this window closed after reading the message(s).
The help panel is toggled via the F1 key, e.g., pressing the F1 key triggers the closing and opening of the help panel. Make it disappear for now.
Maple opens a new worksheet in document style. This style is appropriate to write active documents that contain a mix of text and mathematics. We will write such documents later. It will be easier for the moment to create well defined execution groups to provide an intuitive and structured document layout.
The user directs Maple to perform tasks via "commands" which are typed directly at the input prompt. ">". Maple also presents a menu bar which allows some basic functions to be performed at the click of a button. The following shows the menu bar of the Maple 10 user interface window:

Bringing the cursor on top of any of the icons on the menu bar triggers Maple to display a short explanation of the function of the targeted icon. For instance, the first icon on the left creates a new worksheet, the second opens an existing worksheet (with an ensuing dialog), the third saves the worksheet, the forth triggers printing of the worksheet and so on, The functions of the first few icons are pretty much universal among different applications. Others, like the T option which triggers the text mode (as opposed to the Math mode), are particular to Maple.
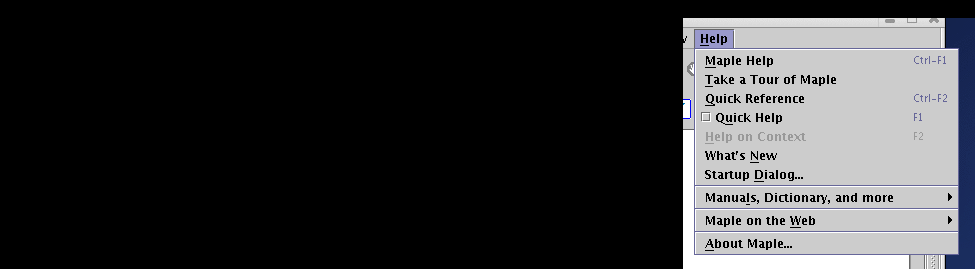
The menu bar on the Linux, PC and Macintosh platforms remains active through each Maple session, and can also facilitate the file manipulations, as well as the access to the Maple help functions. The file and help pull-down menus illustrated below (the Linux and MAC interfaces are very similar) show customary and easy to understand functions.

Let us create an execution group. To do so, find the command execution group in the insert menu bar, and click on the after cursor option.
Each execution group is characterized by an input prompt > followed by one or many Maple commands. These commands are input by the user and displayed by Maple either in Maple input format, labeled 1D math, or in a more intuitive mathematical form or 2D math. These two styles are toggled by the F5 key or by direct selection via the "second box" of the text option in the top menu bar.
A Maple worksheet consists of a series of commands, divided among execution groups, optionally separated by text. Each command is an operator form terminated by a semicolon ";". The commands are typed at the input prompt ">". The "enter" key (regular "return" key on the keyboard or the key at the bottom right on the numeric keyboard) triggers the transmission of the command (or group of commands) under a single prompt to the Maple "compute engine". The results are then written out to an "output" region on the worksheet. Note that commands are never re-run by Maple, unless they are "entered" again. <shift>+<return> allows to insert a new line from within the same command prompt; this will become essential later.
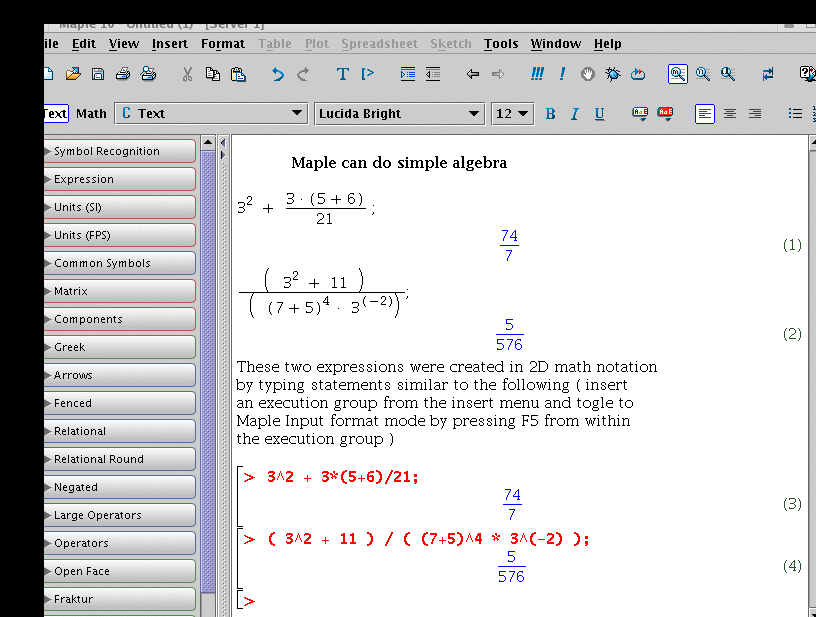
The Maple worksheet contains a third type of regions beside the "input" and "output" ones, the "text mode" region. Text can be entered at the prompt by selecting the "text mode", T, from the Maple menu bar. This is useful to write titles and comments to better document the work.
The commands above were typed in 1D math, or Maple input, style. Maple
automatically translates the notation in 2D math style if this
is the chosen style.
![]() Section 2.1
Section 2.1 ![]() Chapter 2
Chapter 2 ![]() Section 2.3
Section 2.3 ![]() TOC
TOC
|
Any questions or suggestions should be directed to |